Friday, March 10, 2017

Warlord Titan Build part 1

So after the perfect storm of re-reading Titanicus for the 4th or 5th time, a large overtime check and the dollar being the strongest its been against the pound in 25 years i finally pulled the trigger and ordered a Warlord Titan.


Titanicus was what really gave me the drive to get one, a seriously great read but i'm warning you it will really make you want to pilot your own engine on the tabletop.


So like a child on Christmas morning i was greeted a few weeks later by a package from England that was about 30 lbs of resin.

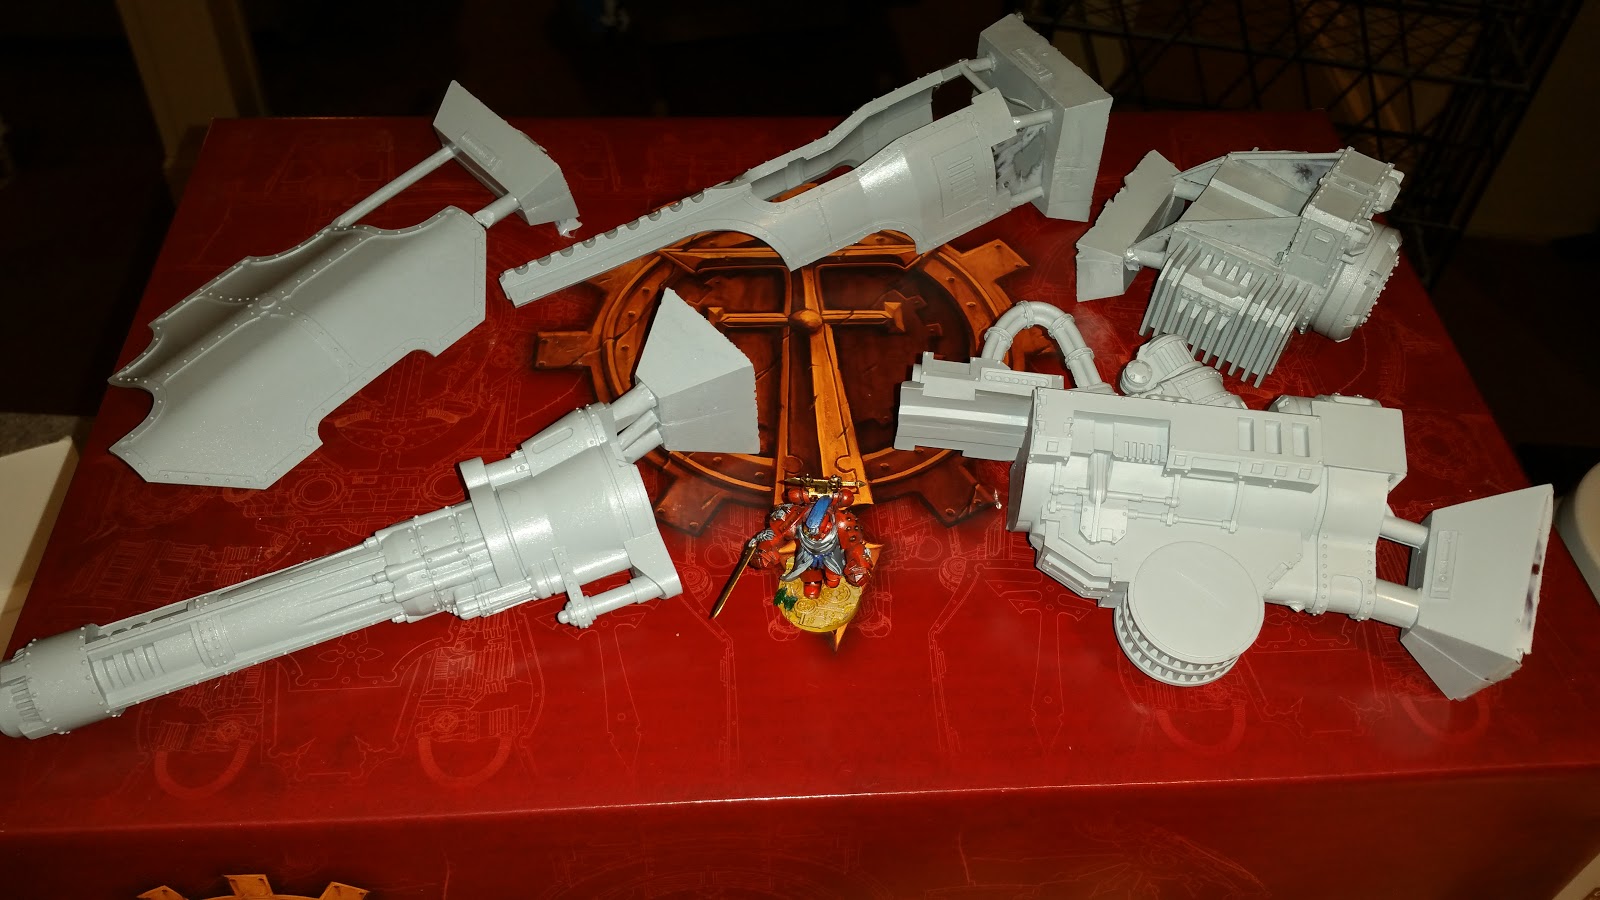
The size comparison when you put it next to the everyday 40k models is truly amazing


As anyone who has ever worked with resin before you know the first thing you have to do is scrub it all in warm soapy water to remove any lingering mold release agent. With a build this size it was the worst part of the entire build. Several days later with raw hands i was finished. I soaked and scrubbed and rinsed every piece twice which god willing removed any traces of the mold release that will screw up my paint job.


My friends and i ran into a Warlord titan about 6 months ago at Templecon in Rhode Island and chatted with the builder a bit. His Warlord was not magnetized at all and had to be transported as-is, he also talked about one of the model design shortcomings being the poor design of the knees and the enormous weight place on them. (his warlord tended to wiggle in the knees when jostled) 

With this conversation in mind i planned my build around several key ideas
  1. Magnetization and making the Warlord modular for transport
  2. Pin the fuck out of all the joints
  3. Make a base for it for added stability 
While waiting for the Warlord to arrive from Forgeworld i busied myself reading every blog out there detailing various owners builds and learned a lot. For example when you're dealing with resin pieces of this size i used things i thought i would never need for building Warhammer models like JB-Weld epoxy and clamps.

I did use some super glue for some smaller pieces, for example the Apocalypse Missile Launchers you need to glue in each missile. I HIGHLY suggest you dry fit each piece first as they do not "lock in" and you certainly want them all facing the same direction.


For the vast majority of the build i used JB-Weld Steel Epoxy for its strength in all the structural components of the Warlord. It's working time is somewhere around an hour once mixed with its cure time being around 12 hours. I got in the habit of once my wife and I got the kids to bed i went down to the basement for an hour or so then built, epoxied, and clamped whichever piece or pieces i was working on and letting it cure till the next night and repeating the process. Often because of the position of the clamps you really only can glue on one or two pieces at a time and have to wait for them to cure. Smart planning is to multitask by working on the body or legs then shifting to a gun or something else while the other drys.

One of the first things i did was get to work on the torso. I ordered some very large 1 inch x 1/2 inch magnets for the torso, these bad boys have a pull strength of 75 pounds which i quickly found was dangerous as i separated them from the plastic wafer they are shipped in and accidentally let them come together.... one $15 magnet obliterated and time to order more magnets....


This is one of the magnets seated in a cavity i drilled into the lower torso with a Forstner bit, you can see a small hole on either side to eject the excess JB Weld, It cured with a slight lean towards one side but still works just fine.

For the upper torso plate i debated drilling through it and having magnet to magnet contact but after my most recent experience with these beasts i went another way


That is its companion magnet sitting on top of the upper torso plate encased in a tomb of JB Weld.You'll also notice more liberally applied to all the seams for strength.

Pros:
The magnets not actually touching means less chance of destroying said magnet which would be near impossible to replace once the model is complete

Cons:
Since they are not touching and are separated by a quarter inch or so of resin the pull strength is reduced


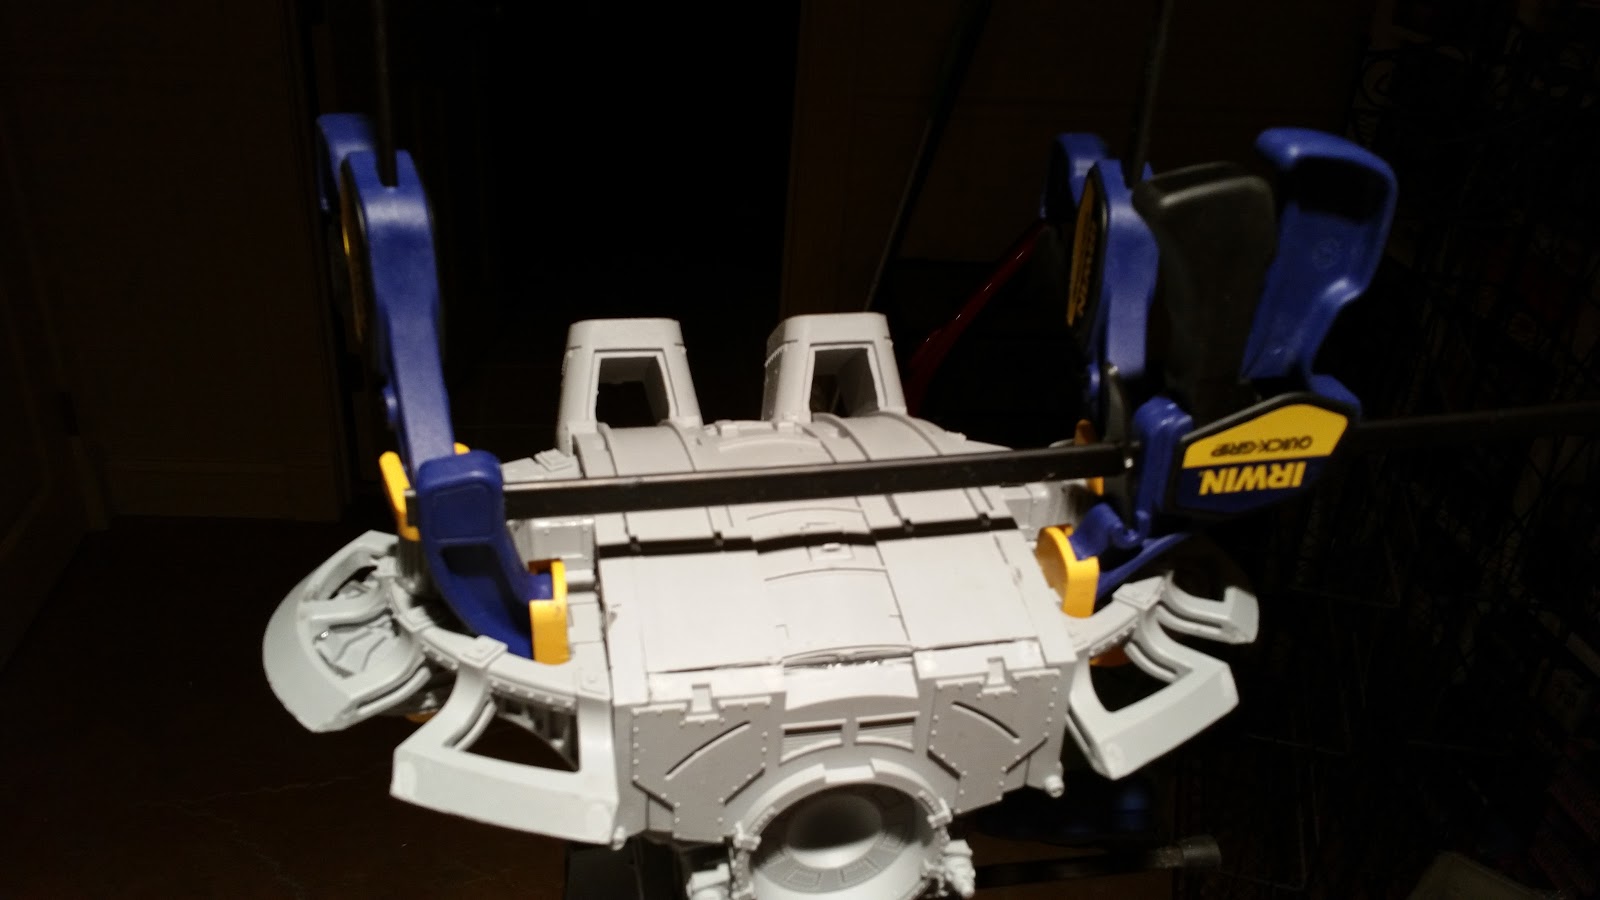
Clamps... all the clamps


Final verdict is it works, i dont have to worry about accidental magnet contact and destruction and the pull force is still sufficient to hold the titan together. You can also see in this picture the main body of the upper torso mostly complete.

It was at this point i said to myself "hey, there is like a giant 4x6x4 space inside this titan and i should put all the electronics and lights and smoke machines and things inside it!"

Then i realized the top part could not be magnetized since the engines are 3 pieces each and need to sit on top of it. I have seen some nice titans where people do put electronics in there and even lights in the heat sinks. The only way i can see them getting away with doing that and getting back in to change batteries and such is they must cut an access door somewhere that doesn't show upon inspection.


I may still add lights to the head as my friend John is deep into that stuff and thinks we can fit it all in the head cavity.


Finished the main weapons... Rhino for size. You'll also notice a very large wooden base my woodworker uncle was kind enough to make for me.


Attaching the shoulders: these hold on the 3 part shoulder plates and the shoulder mounted weapons. there IS a right and left so always dry fit before you glue. The problem i ran into with this is upon dry fitting i noticed they were not level. This could of been from resin warping or the way the arm mounts underneath were attached or both. Nothing to do about it at this point but adapt and overcome or the weapons once mounted would look ridiculous.


My dremel became a key part of this build. I shaved down the underside of the shoulder mounts and the groove on the top of the arm mounts. It looks ugly but will be hidden by the shoulder plates.


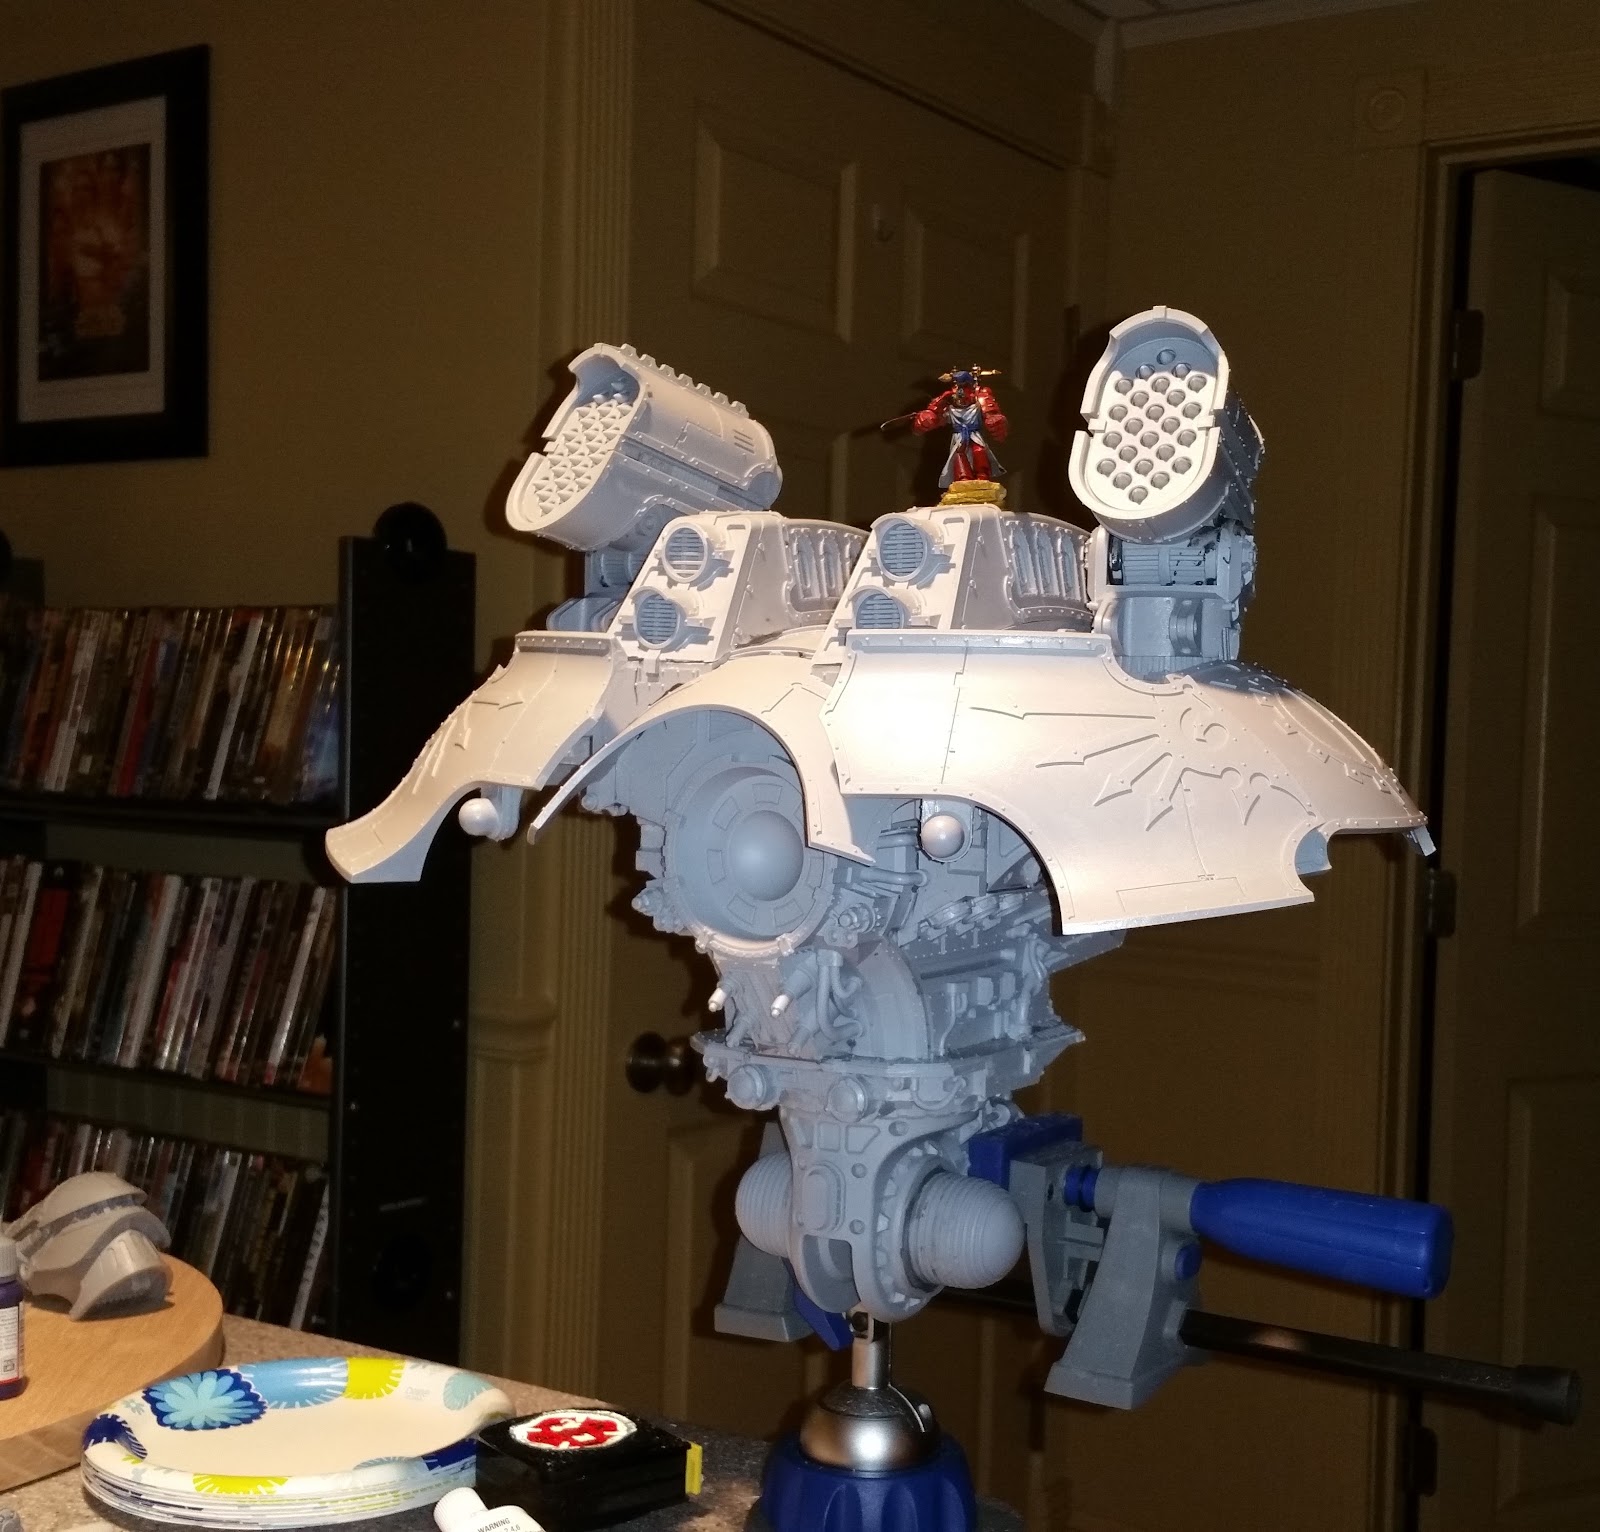
Upper torso nearly complete, shoulder armor dry fitted on, Murray the marine on top for size. All the armor plates were left off the model for ease of painting with the exception of the plate directly above the head socket. It's worth noting this doesn't want to stay in place for gluing and is nearly impossible to clamp so this was probably my first chance from JB Weld to JB Quick. Still a hard epoxy but sets in 10 minutes or less, it only has a working time of about 4 minutes once mixed so be ready!


Since i wanted my Warlord to be modular that meant in addition to magnets it need to be secure yet able to be removed from its base. This is what i came up with. I drilled two holes in each foot base and glue in barrel washers. These will meet up with bolts and washers coming up from the bottom of the wood base. After completion i realized two in each foot was probably overkill but hey i over engineer everything.


Assembling the legs was easily the most problematic part of the build as you need to get the ball joints of the ankles, the knee joints, and the hips all in the right spot on the pelvis... all at the same time.

What i did to accomplish this was this
  1. Figure out roughly where i wanted the feet
  2. hold the 2 sections of each leg together on the pelvis, figure out the stance and mark it on the knees.
  3. I then locked each knee into place with a brass rod running vertically and another horizontally
  4. With the knees locked in place i again held the legs onto the pelvis for several more dry fits. I also attached a level to the top of the hip and kept and eye on the bubble
  5. Finally i broke out the JB Quick (remember 4 min work time, 10 minute cure) and applied it to the hips and held the two legs on the hips for 10 minutes or so making minor adjustments while watching the level the whole time.
  6. Once that was done and i let it do a hard cure for 12 hours or so i went back in and used JB Weld on the knees (all the pins and the joints themselves). Again, waited for it to cure, i believe i used straight JB Weld on the knees for strength as they were locked in place with the pins and i didn't need to be around to hold them.
  7. Lastly once the legs were done i re-position the foot plates and attached the legs with JB Quick
  8. Allowed the whole thing to dry and then moved to install the leg pistons 
  9. I also went back in and drilled through each hip into the pelvis to install long brass rods, this was probably overkill but again, i like to over engineer 


It was at this point while dry fitting the leg armor i realized i fucked up... You may notice the top picture (the front) has detailed pistons and the bottom picture (the back) looks plainer.

This is because i'm an idiot and somewhere in the dozen of leg dry fittings i swapped the thighs and put them on backwards...

Well, nothing i can do about it except drink some fine tequila and wait for a solution to present itself.

So, dis-assembly and reattaching properly was NOT an option, 2 pins in each knee, another in each hip and completely cured JB Weld throughout. I would of destroyed the model if i had tried. So once again time to adapt and overcome.


I used brass rod stock to make extra long pistons, not shown is i also used a chunk of green stuff under each plate to support the underside.


The back thighs may look a little plain but my mistake is barely noticeable from the front


Moving on to the base! Obviously something as grand as a Warlord Titan needs something fancier than a plain base so i order 8 lbs of Apoxie Scuplt. This is a 2 part epoxy clay that has several hours of work time once mixed and then hardens and is not brittle.

It turns out i probably should of used at least another 4lbs if not more as i didnt get the base as thick as i wanted but with the solid wood and 8lbs of clay the base is already pretty damn heavy.

Some things i learned
  • Mix the two parts in small doses, the clay is not pliable enough to try and mix all 4lbs at once
  • Use plenty of water on your hands, surfaces, rolling pin, and tools to keep the clay from sticking
The application of clay and texturing was complete at this point, you can see where i started the first layer of sandbags for the bunker and you can see a little bit of an Eldar Wraithknight underneath the right leg. (Hey, a model this big needs to be crushing something underfoot)


More or less how the Wraithknight will look in the end, i actually changed the leg a bit, i was worried i put too many hoses and pistons in but i think it adds something.


Construction of the sandbag wall, battle damaged rhino and crushed Wraithknight. 

Since my painting skills can best be described as sub par i opted to commission my good friend Chris who is an excellent painter to give this god machine the justice it deserves. More pictures once it's back from paint!


As i write this i realize i didn't take as many pictures as i thought during construction and am missing key parts of the build such as magnetizing all the weapons and some other basing details. More to come in part 2!

Big thanks to 30MM madnesses Warlord build guide among several others 


Back in hardware mode!


It's been quite a while since i've had time to post here (or play much 40k lately) but life has been busy. Frankly 6th, and then 7th edition seemed to have taken the wind out of the sails of a lot of us. But with 30k seeming quite awesome and 8th edition on the horizon i'm back!

Look for another post soon documenting my biggest build to date!


Monday, February 17, 2014

Dreamforge Leviathan Crusader build


I've been very absent from this blog as of late but i'm back with a big build to make up for it.

As just about everyone in the 40k world saw this week that the next offering from GW are the "Knight Titans" AV 13/12/12 6HP super heavy walkers. Armed with a Destroyer Str close combat weapon and either a 2 shot battle cannon or a 36" large blast melta, 370 or 375 points.


The GW kit will cost $140 and comes with all options to make either variety, i decided to go a different direction. A while back i got in on this Kickstarter from Dreamforge games

https://www.kickstarter.com/projects/dreamforge-games/something-wicked-this-way-comes-crusader-plastic-m?ref=live

I got two of the 28mm Leviathan Crusaders, one Leviathan Mortis, a bunch of special weapons for arms swaps and three 15mm versions as well.

Personally i think Dreamforges offering is more "knight" like and am pretty happy with the finished results. A stock Leviathan Titan comes with a gatling type cannon, a close combat sword and looks like this


Obviously the stock minigun doesnt fit WYSIWYG as a battle cannon or super melta, and while the sword is passable as a D str close combat weapon i decided to do this build with a super melta and chainsword from my options below


Dreamforge has designed the arms in such a way that they are very easy to interchange and require no magnets


The unboxing

Easily the biggest kit i have ever worked with

Packed in a foam padded box?! very nice

The contents, quite a lot of sprues

the instructions weren't quite as intuitive as what i'm used to from GW but still mostly understandable

As i found out during the build screws are used throughout the model to make all the joints HIGHLY posable and adjustable on the fly if you didn't want a static pose, i glued and locked in the joints for the most part for painting, i haven't locked in the shoulder joints yet and i may leave these free

Bare legs without armor, now to set up the next picture... While no definate height has been leaked about the GW knight titan it is believed to be a little taller than a Trygon which is in turn a little taller than a Riptide

Oops, guess i'm going to be a lot taller than the GW Knight Titan

Progress!

You can see the stock smokestacks in the directions, i decided to go with the modern looking bonus ones from the kickstarter. When i build the Mortis version i'll keep the older smokestacks

Almost complete, you can see it is rather oversized on a GW MC oval base which looks like what is the legal size for the GW Knight Titan in the pictures but since they are unclear GW might of come out with a new size base just for it. Not going to pin it to a base until that's confirmed.

Weapon arm work.... Riptide's not so scary now is it?

The finished product, very cool looking

A final size comparison


Pros and cons, Dreamforge vs GW

Price
GW Knight Titan $140
Dreamforge Leviathan $98, Addtional gun arm (Melta or Cannon) $28, Total $126

As i mentioned earlier the GW version comes with all the parts to make either type, is obviously the intended size for game purposes but you can get a knight that is bigger, cheaper and IMO better looking from Dreamforge.


Articulation
GWs version isn't out yet but there is no way it will even come close to the level or articulation the Leviathan has. To be fair it can be somewhat of a liability to a modeler. Yes you can make almost any pose conceivable but is a real bitch to lock into a pose in the building stage


Final Thoughts
In closing i'm very happy with the final product, looks a lot more "Knight" like than the GW version IMO and with weapon options very close to the GW Knight Titan it's easy to meet WYSIWYG.

Would i have gone the same route if i didn't already have them in my basement? maybe, maybe not. The size being large than the GW version may be an issue bit i don't expect my opponenet will complaing about my titans getting less of a cover save.


Monday, February 18, 2013

Moving forward, Allies and which to take?


Now that 6th edition has been around for around 7th months and for most of that time I've either been playing straight Imperial Guard or IG with Grey Knight allies.

My Armies

Imperial guard, i love my big guns and lots of shooting which is my favorite aspect of the game. Love my Soviet theme and everyone i play seems to get a kick out of it too.

Pros: 
Big guns and lots of them
Manticores!
tons and tons of cheap troops

Cons:
All those troops are very squishy
nothing good for assault

I want to keep playing my Russians but they need tougher friends


Grey Knights, are my first army and i still enjoy playing them, my biggest problem is they're one of the most expensive "elite" armies point-wise and in a 6th edition world where having the most bodies on the board is the way to go going straight GK isn't that strong of a choice in my opinion.

Pros:
great in assault
good in shooting
great psychic powers
Coteaz
Dreadknights

Cons:
not battle brothers with anyone
expensive point-wise

The biggest reason to me to not take them is the lack of battle brother choices, don't get me wrong it makes perfect sense fluff-wise but being unable to target and be targeted by psychic powers hurts big time.


Necrons, i bought about 1500 points of Necrons when they first came out... and they've been sitting in my basement still in box ever since. I know they pair up well with GK and are strong codex, i just haven't gotten around to them and honestly haven't excited me as much as other options


Dark Angels, i love just about everything in this new codex, strong new options, cheap troop choices, the flyers and specialist speeders are garbage and overpriced in my opinion but I've got tons of bikes, troops and deathwing and I'm looking forward to trying out all the options.

Pros:
highly mobile army
battle brothers with most of my armies
really great diverse units
new specialist equipment options other codexs don't have access to (like infravisor for 5 points letting a whole dev squad ignore night fight)
awesome allies combos such as Azrael making a 50 man blob squad  fearless with a 4++ save

Cons:
i really don't see any glaring ones

I've got a lot of exciting ideas for them that pair up well with IG and with the resin bases, shields, shoulder pads and other touches I'm tricking them out with they are going to be an outstanding looking army.


Blood Angels, they have some exciting infantry, fast vehicles and strong dreadnoughts, not to mention some of the strongest HQs in the game.

Pros:
HQs
Dreadnoughts (Furioso, death company, Libby dread)
Sternguard
Fast vehicles
Battle Brothers with most of my armies

Cons:
Expensive infantry choices

I don't claim to be an expert on Blood Angels, far from it. All i know is they have some exciting unit choices and I'm itching to try them out. I've got 30 Horus Hersey era troops inbound from forgeworld, my plan was to use them as Sternguard and possibly paint them up with a Soviet them allowing me to use them as a pseudo Blood Angels successor chapter or Vanilla Marines chapter. I also have a couple more contemptor dreads on the way which will look great as furioso and death company dreads.

Vanilla Marines, again I'm no expert on vanilla. If i went with them over Blood Angels it would be because of Pedro Kantor making Sternguard troop choices. Possibly Ironclad dreads but i need to do more research.

Pros:
Scoring Sternguard? yes please
Unique Space Marine units not found in other codexs
Battle Brothers with most of my armies

Cons:
Expensive lackluster HQs


Primary? or Allied Detachment?

Grey Knights: Definately allied detachment if i even take them

Imperial Guard: This is a much tougher one.. in primary i get to take 3 heavies which is arguably the best part of the IG codex. However with much stronger troop and elite choices elsewhere i think I'm going to have to relegate them to an Allied Detachment role

Necrons: I have no plans to assemble them and stick them in an army list but if i did it would likely be an Allied Detachment

Dark Angels: i think they need to be in a primary role, their HQ choices are best suited to be warlord and while i can't see me taking more than 1 heavy support choice i would be servery limited with only 2 troops and 1 elite or 1 fast attack.

Blood Angels: the problem with them being an Allied Detachment is the same as Dark Angels, BA also have strong HQ choices better suited for a warlord and i could easily take 3 elite slots with BA.

Vanilla: I'm positive they will be an Allied Detachment, the only real plan i have for Vanilla is Kantor with multiple scoring Sternguard and perhaps a dread or something.


Another thing is if i decide to go with Blood Angel or Vanilla Marines i plan on using drop pods, so i guess i know what I'm spending my store credit winnings from the doubles tournament on. 


2000pt Doubles tournament at Battlegrounds


This past weekend Battlegrounds Abington held it's inaugural 40k event in the new store. It was an interesting event with well designed missions and good opponents, they also allowed Forgeworld units which was nice to see some of the different things Forgeworld offers.

The event was doubles where each partner brought 1000pts and was limited to 2-3 troops, 1 from every other slot and each team member allowed to double a slot, just not the same one. For example i brought double heavies and my partner bill brought double fast attack.

My list


HQ: Company Command Squad 50, +4 Plasma guns 60, +chimera 55 = 165

Troop1: Veteran squad 70, +3 plasma guns 45, +chimera 55 = 170
Troop2: Platoon, 4 Infantry squads 200, +commissar 35, +1 sgt with meltabombs 5, Platoon Command Squad 30, +4 flamers 20, +chimera 55 = 345

Heavy1: Manticore = 160
Heavy2: Manticore = 160


Bills list

Chaos Lord 65, Juggernaut of Khorne 35, Mark of Khorne 10, Axe of Blind Fury Replace CCW) 35, Sigil of Corruption 25, Buring Brand of Skalathrax, (Replace Bolt Pistol) 30
200

Chaos Spawn 1 30, More Spawn 4 120, Mark of Khorne 5 10, 160

Maulerfiend 125

Heldrake 170, Baleflamer 170

Khorne Bezerkers 5 105, Extra Guys 4 76, Chain Axes 6 18, Rhino 35, Dirge Caster 5, Dozer Blades 5, 244

Cultists 10 50

Cultists 10 50


Game 1
Triangle corner deployment, 
Primary objective: Relic
Secondary: marked for death, 5th edition kill points
Tertiary: Victory point differential

Our opponents were a father and son team (a nice thing to see, a father and son bonding over a wargame). They each brought new Dark Angels, the son fielding tac squads, devastators, and a librarian. The father brought ravenwing, Sammael, bikes, Black knights, and a flyer (the name escapes me)

Our biggest mistake this game was the secondary, we had to choose a "half" of their army to be marked for death and whomever had more kill points at the end wins. We didn't read the packet that well and had assumed it was 6th edition victory points so we chose the ravenwing half and while we destroyed everything sans the flyer, 1 bike and almost killing sammael they beat us on kill points because they smartly chose my IG to kill.

My manticores were uncharacteristically horrible this game, they went after their sole Rhino first turn to get first blood only to find out the Librarian was granting it a 4+ invuln save. The only other decent hit they got all game was 11 hits on the dev squad which the son promptly passed all 11 2+ armor saves lol

My plasma and flashlights did some decent damage to the bikes but couldn't kill sammael, whom at the end of the game after killing all the khorne beserkers and several guardsmen on top of the relic caused my commissar to fail her morale check... twice... and they ran away and died.

While that was going on Bill's lord and entourage were running rampant through the tac squads and rhino and such. The Helldrake showed up turn 2 and flamed a good amount of bikes... then promptly died to flakk missiles from the Dev squad. The Maulerfiend surprisingly lived almost until the end and definitely earned its points back.

Results:
The game ended with neither of us having the relic, our opponents won kill points as secondary, we got a few more points then them on victory point scale and scored linebreaker and (i think) we slayed his warlord the librarian
20 out of 49 points


Game 2
Standard 12inch deployment
Primary: objectives (which have to be held by a troops choice from each "half" of the army
Secondary: Kill points i think?
Tertiary: Victory point scale

Our opponents were brothers (i think) and both brought Vanilla marines, total of 2 Vindicators, a rhino, 2 Razorbacks with Lascannons and Sternguard inside, scouts and some heavy hitting HQs, a libby who had access to every psychic power in the codex and i forget the other.

Nightfight, our opponents went first bringing all their armor up 12 to bring the Vindicators into range for turn 2. I belive their only shooting was a couple of lascannon shots our way that nightfight cover saves took care of.

Our turn 1 is where my Manticores redeemed themselves for all the Game 1 nonsense. I got a triple shot with my first which penned both Vindicators and both Razorbacks and while my damage chart rolls were lackluster it did stun both the Vindicators so they wouldn't be dropping Str10 Ap2 pie plates on us turn 2 which is what we wanted. My second manticore destroyed 1 of the Vindicators and Razorbacks while my plasma took out the rhino, some more plasma fire whittled down a sternguard squad and some scouts. Bill's Helldrake came in early again and vector striked and ruined some marines day.

Results:
We tabled our opponents around turn 4, it was a fun game for us but i did feel a bit bad because their armor heavy list played into our strengths.
49 out of 49 points

Game 3
Short edge table deployment
Primary: objectives
Secondary: table quarters
Tertiary: Victory point scale

We were paired up against Space wolves which was pretty much 1000 points of space marines on wolves with stormshields and an aegis defense line and Ravenwing with Sammael, bikes, attack bikes and some scouts.

We went first and again we had a good counter to our opponents army in the Manticores vs the stormshield marines, the Str10 making their toughness 5 and 2 wounds meaningless. The manticores took our 4 of them turn 1 and another 2 or 3 turn 2. between that and plasma fire only the wolf lord and 2 of his guys made it into assault with Bills heavies. Up until now whenever bill's lord ran into somebody in assault he quickly killed them but the wolf lord was certainly his match, in the first turn challenge they wounded each other a couple times and the squad took out the rest of the wolves. Round 2 of they assault they killed each other.

I had deployed the blob spread out as best i could to block his outflanked bikes from arriving anywhere near our side of the board and objectives. When they did come on the multi melta attack bike took out my Chimera  and his bikers with plasma went after the Khorne beserkers. My next round of shooting i aimed my 4 flamers and 4 double tap plasma guns at the bikes that were left and killed all but 1 who failed his morale and then auto rallied next turn. The Maulerfiend was less impressive this game not earning his points back in things killed but he did suck up a lot of fire so he did his job.

The helldrake didn't show up until turn 4, vector striking the other attack bike, dodging the interceptor autocannon fire and flaming some scouts. At this point all our opponents had on the board were some scouts,  Sammael (who did very little the game as his plasma cannon kept scattering onto Bill's Rhino and then not even glancing) and some wolf pups (i've no idea what their actual name is, my apologies) in the back. Our opponents conceded the game.

Results: 
49 out of 49 points

There were 27 teams there so 54 people overall which is a great showing for a BG event. The prizes were...

Best Generals
Second Best Generals
Third Best Generals

Players Choice

Best showing (painting)
Second Best
Third Best

Bill and i initially thought we had no chance after our poor showing game 1, but in the end we won Third Best Generals!

I was surprised that Bill didn't place at all in the painting competition since his painting skills are above par, a decent display board, top shelf resin bases and the only guy there to go the extra mile of putting LED lights in several of his models. But hey, we did win 3rd place so i can't complain

As of posting this BG hasn't posted full results yet and will update the other awards when they do.